Are you tired of feeling sticky and sweaty after a long day of hiking or camping? Well, we have the perfect solution for you – a DIY camping shower! Picture yourself being able to enjoy a refreshing and revitalizing shower in the great outdoors, no matter where your adventure takes you.
Here, we will show you how to make a camping shower and how easy it is to assemble it. So let’s dive right in and learn how to make your camping experience even more enjoyable with this essential creation!
Introduction: Why You Need a Camp Shower

When it comes to camping, many people often think of roughing it in the great outdoors. While this can be an exciting and adventurous experience, it also means sacrificing certain luxuries that we are accustomed to in our daily lives. One of those luxuries is a hot shower.
While some may argue that taking a shower while camping is not necessary, there are several reasons why having a camp shower can greatly enhance your camping experience.
1. Hygiene And Cleanliness
One of the most obvious reasons for having a camp shower is hygiene and cleanliness. Spending days or weeks in the wilderness without access to clean water and proper bathing facilities can lead to feeling dirty and uncomfortable.
A camp shower allows you to maintain good hygiene by providing you with a way to wash away sweat, dirt, and other grime from your body.
2. Refreshment After Outdoor Activities
Camping usually involves engaging in various outdoor activities such as hiking, fishing, or kayaking. These activities can leave you sweaty and exhausted. A quick refreshing shower at the end of the day can help rejuvenate your body and mind before settling down for the night.
3. Mental Well-Being
Taking a warm shower has been proven to have positive effects on mental well-being by reducing stress levels and improving mood. This is especially important when camping since being out in nature can already have a calming effect on our minds.
Adding a warm shower to this equation can further enhance this sense of relaxation and well-being.
4. Convenience
Having a camp shower can also be incredibly convenient. Instead of having to drive into town or to a nearby facility to take a shower, you can simply set up your camp shower at your campsite. This saves time and effort, allowing you to spend more time enjoying the great outdoors.
5. Environmental impact
Using a camp shower can also have a positive impact on the environment. By using biodegradable soap and minimizing water usage, you can reduce your environmental footprint while still maintaining good hygiene.
In addition to leaving behind some comforts of home, camping showers can enhance your overall camping experience by keeping you clean, refreshed, and mentally alert.
So next time you plan a camping trip, consider investing in a camp shower for added comfort and convenience in the great outdoors.
Materials Needed for DIY Shower (Outdoor Shower Materials)
1. Water Container:
The first and most essential item you will need for a DIY camp shower is a water container to hold the water. You can use any sturdy plastic or metal container that can hold at least 5-10 gallons of water.
2. Hose:
A hose will serve as the main component of your camp shower, allowing you to direct the flow of water. It’s best to use a garden hose with a spray nozzle attachment, but any flexible and durable hose will do.
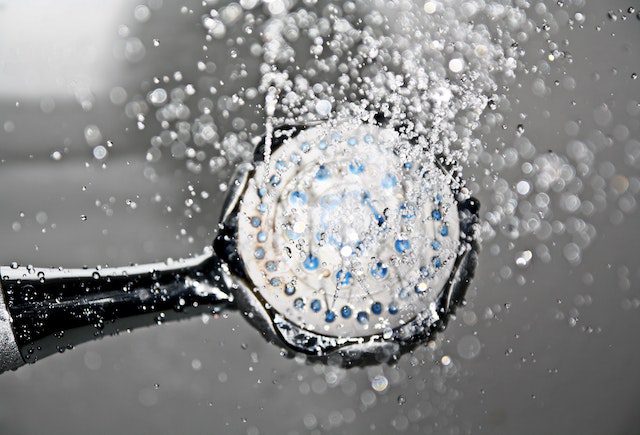
3. Shower Head:
You can purchase a specialized showerhead designed for camping showers, or you can repurpose one from an old garden sprinkler. Make sure it has small holes that create a fine mist rather than large streams of water.
4. Bucket or Basin:
To catch the used water from your shower, you’ll need a bucket or basin placed under the hose end. This way, you can easily dispose of it without leaving any mess behind.
5. Rope:
A strong and sturdy rope will be needed to hang your camp shower in place securely. Avoid using thin strings or twine as they may not be able to support the weight of the water container.
6. Shower Curtain or Tarp:
To create privacy while taking a shower, you’ll need some sort of barrier between you and the rest of your campsite. A basic plastic tarp or waterproof shower curtain will work perfectly for this purpose.
7. Hooks and Clips:
Depending on where you’re hanging your shower, you may need some hooks or clips to attach the rope to trees, poles, or other structures.
8. Towel:
Lastly, don’t forget to bring a towel for drying off after your shower. You can also use it to wrap around yourself for privacy when getting in and out of the shower.
9. Optional:
If you want a warmer shower experience, you can also bring a solar camp shower bag that heats up water using sunlight. These are portable and easy to use but may not be as effective if there isn’t enough sunlight during your camping trip.
How to Make a Camp Shower (5 Simple Steps)
Here are 5 Easy steps on how to make a camping shower:
- Step 1: Choose Your Water Source
- Step 2: Build the Frame for Your Camp Shower
- Step 3: Secure the Shower Head and Hose
- Step 4: Create a Privacy Barrier
- Step 5: Test Your DIY Camp Shower
Step 1: Choose Your Water Source (Easy Camping Shower)

When it comes to creating a camp shower, the first and most important step is choosing your water source. This will determine how much water you have available, what kind of filtration or treatment may be necessary, and how portable your shower will be.
There are several options for water sources when camping, each with its own pros and cons. Let’s take a closer look at each one to help you decide which is best for your needs.
1. Natural bodies of water:
One option is to use a natural body of water as your source for shower water. This could include a nearby lake, river, or stream. The benefit of using natural bodies of water is that they are readily available and usually free to access.
However, it’s important to remember that these sources may not always be clean or safe for bathing, especially if there are other campers in the area who may also be using them. Make sure to check with park rangers or other local authorities before using natural bodies of water as your shower source.
2. Campground faucets:
Many campsites have communal bathrooms with sinks and showers available for campers to use. If you’re staying at a campground with these amenities, utilizing their faucets can be an easy way to get clean while camping.
However, keep in mind that these facilities may not always be conveniently located near your campsite and they may require quarters or tokens for hot water.
3. Portable containers:
Another popular option for a camp shower is to use a portable water container. These containers can range in size from small, handheld bottles to larger, 5-gallon jugs. They can be filled up at home before your trip or at a nearby water source when you arrive at your campsite.
Portable containers are easy to transport and offer the convenience of having your water source right at your campsite.
4. Solar showers:
Solar showers are another type of portable shower that uses the power of the sun to heat up water. These typically consist of a large bag or pouch with a hose and shower head attached.
The bag is filled with water and left in the sun for several hours to warm up. Then, it can be hung from a tree or other sturdy object for an outdoor shower experience.
No matter which water source you choose, it’s important to consider how much water you will need for each person using the shower and make sure to have enough on hand.
It’s also a good idea to have some form of filtration or purification system in place if you are using natural bodies of water or filling up campground faucets. This will help ensure that the water is safe for bathing.
Now that you’ve chosen your water source, it’s time to move on to the next step: creating your shower set-up.
Step 2: Build the Frame for Your Camp Shower (Portable Shower System)
After gathering all the necessary materials, it is time to start building the frame for your camp shower. This step is crucial as it will provide support and stability for your shower system.
Materials Needed:
- Four wooden posts (at least 6 feet tall)
- Measuring tape
- Saw
- Drill
- Screws
- Hammer
- Nails
Instructions:
- Start by measuring and marking the four corners of where you want to set up your camp shower. Make sure that the area is flat and level.
- Cut the wooden posts according to your desired height using a saw. Ideally, they should be at least 6 feet tall to provide enough clearance for an average person to stand under.
- Once cut, use a drill to make holes in each post about an inch from the top and bottom.
- Next, place one post on each corner of your marked area and secure them by hammering nails into the ground through the holes made in Step 3.
- Measure and cut two more pieces of wood that will serve as crossbars between two opposite posts. These bars should be placed at shoulder height when standing inside the shower frame.
- Attach these crossbars to the posts using screws or nails, making sure they are securely fastened.
- To add extra stability, you can also add diagonal braces by cutting two more pieces of wood diagonally from one corner of your frame to the opposite corner and securing them with screws or nails.
- Once your frame is built, double-check that everything is secure and stable before moving on to the next step.
Congratulations, you now have a sturdy frame for your camp shower! In the next step, we will add the necessary elements to make it functional. Here is another guide for
Congratulations, you now have a sturdy frame for your camp shower! In the next step, we will add the necessary elements to make it functional. Here is another guide for Packing List for a Well-Organized Backpack.
Step 3: Secure the Shower Head and Hose
Once you have your camp shower set up and filled with water, the next step is to secure the shower head and hose. This is an important step to ensure that your shower stays in place while you are using it.
- Find a Stable Surface: The first thing you need to do is find a stable surface for your camp shower. Look for a flat area that is close to where you will be taking your shower, such as a tree or large rock.
- Attach the Suction Cup: Most camp showers come with a suction cup at the base of the unit. Take this suction cup and wet it before attaching it to your chosen surface. Wetting the suction cup will help create a stronger seal.
- Adjust the Height: Before securing the hose and shower head, make sure to adjust their height according to who will be using the shower. If you are tall, raise it higher so that you can comfortably stand underneath it without having to crouch down.
- Secure the Hose: Once you have adjusted the height of the shower head, take one end of the hose and loop it through any nearby branches or through any hooks provided on your camp shower unit itself. This will help keep the hose taut and prevent it from moving around too much when in use.
- Use Zip Ties or Rope: If there are no nearby branches or hooks available, don’t worry! You can also use zip ties or rope to secure the hose in place. Simply wrap the zip ties or rope around the hose and attach it to a nearby sturdy object.
- Test for Stability: Once you have secured the hose, make sure to give it a gentle tug to ensure that it is stable and won’t come loose during your shower.
- Attach the Shower Head: Lastly, attach the shower head to the top of your camp shower unit. Make sure it is securely attached so that it won’t fall off during use.
Congratulations! Your camp shower is now ready to use! Remember to always check for stability before using and adjust as needed. Enjoy your refreshing outdoor shower experience!
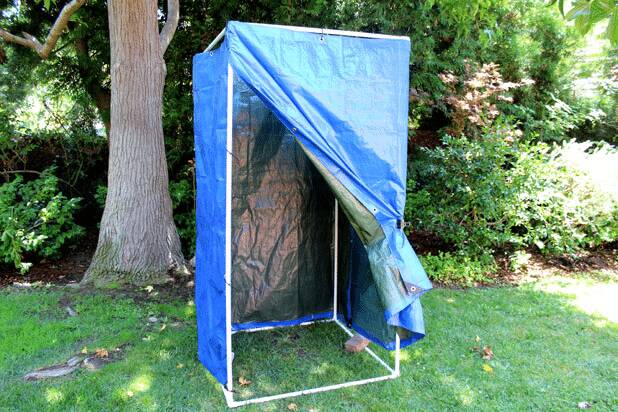
Step 4: Create a Privacy Barrier

Creating a privacy barrier for your camp shower is an essential step to ensure that you can shower comfortably and without any interruptions. It not only provides you with privacy but also makes your overall camping experience more enjoyable and relaxing.
There are various options available when it comes to creating a privacy barrier for your camp shower, such as using tarps, pop-up tents, or DIY solutions.
In this section, we will discuss some of the most popular methods to help you create a suitable privacy barrier for your outdoor shower.
1. Tarp Option:
Using tarps is one of the simplest and most cost-effective ways to create a privacy barrier for your camp shower. All you need is a large tarp, some sturdy ropes or bungee cords, and nearby trees or poles to tie them up.
To create the privacy barrier, first find two trees or poles that are at least 6 feet apart from each other. Then attach the tarp between them by tying it tightly with ropes or bungee cords. You can also use additional stakes in the ground if needed for extra support.
Make sure to choose a waterproof tarp and secure it tightly so that it does not blow away in case of strong winds. You can also add extra tarps on the sides if you want more coverage and protection from wind or prying eyes.
2. Pop-up Tent Option:
Another popular option for creating a privacy barrier is using pop-up tents specifically designed for outdoor showers.
These tents are easy to set up and come in various sizes and designs to suit your needs. They usually have a zippered door for easy access, and some also come with a detachable floor for draining water.
To set it up, simply unfold the tent, lock the frame into place, and stake it down if needed. You can also use additional tarps or curtains on the sides for extra privacy.
3. DIY Option:
If you want to save money or prefer a more customizable option, you can create your own privacy barrier using materials you already have or can easily find at a camping store.
One idea is to attach shower curtains to your existing pop-up gazebo or canopy. You can secure them with curtain clips or tie them up with rope. This allows for easy access while providing enough coverage for privacy.
Or if you have an RV or van with a roof rack, you can use bungee cords or ropes to attach shower curtains or tarps around it, creating a makeshift shower enclosure.
Another DIY option is using PVC pipes to create a frame for your privacy barrier and then attaching tarps or shower curtains to it. This allows for a more stable structure that can be easily taken apart and stored when not in use.
No matter which option you choose, make sure to test it out before your camping trip and make any necessary adjustments for a secure and private shower experience.
Step 5: Test Your DIY Camp Shower (Easy Camping Shower)

After putting in all the hard work and effort of creating your own camp shower, it is important to test it out before taking it on your next camping trip. This will ensure that everything is working properly and any potential issues can be addressed beforehand.
Here are some steps to follow when testing your DIY camp shower:
Fill the Water Tank
Before anything else, make sure to fill up the water tank with enough water for a full shower. This will give you an accurate idea of how well your camp shower works and how much water pressure it provides.
Check for Leaks
Once the tank is filled, check for any leaks or drips around the connections and joints. If you notice any leaks, try tightening the fittings or replacing them if necessary.
Adjust Water Temperature
Depending on the type of heating system you have installed, adjust the temperature accordingly to achieve your desired level of warmth. Some showers may require a longer time to heat up, so be patient and allow enough time for it to reach your desired temperature.
Test Water Flow
Turn on the tap or nozzle and check if there is a steady flow of water from both hot and cold outlets. If there seems to be an issue with either one, troubleshoot by checking connections or adjusting valves as needed.
Time Your Shower
Use a timer or watch to see how long it takes for all the water in the tank to run out completely while taking a shower. This will give you an idea of how long your shower will last and if you need to refill the tank for longer showers.
Check for Proper Drainage
Once your shower is completed, check to make sure that all the water has drained properly from the tank and that there are no clogs or blockages in the drainage system.
If everything checks out, congratulations! You now have a fully functional DIY camp shower ready to be used on your next camping trip. If you encounter any issues during testing, make the necessary adjustments and re-test until everything is working as it should be.
By following these steps and using readily available materials, you can create a simple and effective camp shower that will provide refreshing showers in the great outdoors. So go ahead and gather your supplies, get creative, and enjoy a hot shower on your next camping adventure!
Tips for Keeping Your Camp Shower Clean and Efficient
Keeping your camp shower clean and efficient is essential for a successful camping trip. Not only will it ensure a comfortable and hygienic experience, but it also helps to conserve water and prolong the life of your camping gear. Here are some tips to help you maintain a clean and efficient camp shower:
- Use Biodegradable Soap: When choosing soap for your camp shower, opt for biodegradable options that are safe for the environment. This will prevent harmful chemicals from seeping into the ground or contaminating nearby bodies of water.
- Rinse Thoroughly: After each use, make sure to rinse out your camp shower thoroughly with clean water. This will help prevent any soap residue from building up and causing clogs in the showerhead or hose.
- Hang to Dry: Once rinsed, hang your camp shower upside down in a well-ventilated area to dry completely before packing it away. This will prevent mold and mildew from forming inside the shower.
- Wipe Down Surfaces: If your camp shower has any hard surfaces such as plastic walls or floors, be sure to wipe them down with a damp cloth after each use. This will remove any dirt or grime that may have accumulated during use.
- Avoid Using Harsh Chemicals: While it may be tempting to use harsh cleaning chemicals on your camp shower, they can be damaging to the material and also harm the environment when disposed of improperly. Stick to natural cleaning solutions such as vinegar or baking soda to keep your shower clean.
- Store Properly: When not in use, store your camp shower in a dry and cool place. This will prevent mildew growth and also prolong the life of your gear.
- Use a Strainer: To prevent debris from clogging your camp shower’s drain, use a strainer or mesh bag over the drain while showering. This will catch any hair, dirt, or debris and make it easier to dispose of properly.
- Empty and Refill Water Regularly: If you are using a gravity-fed camp shower, make sure to empty and refill the water regularly to keep it fresh and prevent bacterial growth.
- Keep Personal Items Separate: It’s important to keep your personal hygiene items such as toothbrushes, razors, and soap separate from your camp shower. This will prevent cross-contamination and maintain cleanliness.
- Follow Leave No Trace Principles: Finally, always follow Leave No Trace principles when camping and disposing of waste from your camp shower. Pack out all trash and use water properly to minimize impact on the environment.
By following these tips, you can ensure that your camp shower stays clean and efficient for many camping trips to come!
Conclusion (Portable Shower for Emergencies)
After following the steps outlined in this article on how to make a camp shower, you should now have a fully functional outdoor shower that will make your camping experience much more convenient and enjoyable.
Whether you are planning a weekend camping trip or a longer adventure, having access to an outdoor shower can greatly improve the overall comfort and cleanliness of your trip.
One of the biggest advantages of an outdoor shower is its convenience. No longer do you have to worry about waiting in line for the shared campground showers or trekking to a nearby lake or river to clean off?
With your own portable camp shower, you can easily set it up wherever and whenever you need it. This means less time spent dealing with hygiene logistics and more time enjoying all that nature has to offer.
Furthermore, using biodegradable soap and shampoo while showering outdoors helps minimize the impact on the environment. This is especially important when camping in remote areas where water sources may be scarce or sensitive ecosystems need to be protected.
By using an outdoor shower, you can still maintain personal hygiene without negatively impacting the environment.
Another benefit of an outdoor shower is its versatility. Not only can it be used for washing off after swimming in a lake or hiking through muddy trails, but it can also serve as a makeshift laundry station for washing dirty clothes and dishes.
This multi-functional aspect makes it even more valuable for extended camping trips where resources may be limited.
In addition to practical benefits, taking an outdoor shower can also enhance your overall camping experience by allowing you to connect with nature on a deeper level.
FAQ’s (How to Make a Camp Shower)
How do you make a hot shower for camping?
To make a hot shower for camping, you can heat water using a portable camp stove or a solar shower bag. Fill your camp shower bag with water, hang it in the sun to heat up, or heat water on a camp stove and then mix it with cold water in the bag to reach your desired temperature.
How do you shower at camp?
To shower at camp, you can create a camp shower using a water container and a waterproof bag. Fill the bag with water, hang it from a tree or an elevated structure, and control the water flow with a rope. Stand beneath the bag and use the water for your shower.
How do you make a homemade camp shower?
To make a homemade camp shower, you’ll need a large water container, a waterproof bag, rope, and a tree or elevated support. Fill the container with water, hang the waterproof bag, attach a rope to control height and flow, and you have a simple camp shower.
How do camping showers work?
Camping showers typically consist of a water container and a method for controlling water flow. You fill the container with water, hang it, and use gravity to control the flow. Adjusting the height of the bag controls water pressure. Some camping showers have nozzles for better control.
How much water is needed for a camp shower?
The amount of water needed for a camp shower depends on personal preference. On average, a five-gallon (approximately 20 liters) water container provides enough for a satisfying shower. Water conservation is essential, especially in areas with limited water resources.
How long does a camp shower last?
The duration of a camp shower depends on the size of your water container and how conservatively you use the water. With a five-gallon container, a typical camp shower can last anywhere from 5 to 15 minutes, depending on the flow rate you choose and the amount of water you use per minute.